Wednesday, September 24, 2014

Work In Progress: Osprey: Lover’s Key, Florida Update 5


            Last week I discussed how, from the thumbnail sketches, I arrived at a composition of an Osprey in flight, returning to his nest, where hungry mouths were waiting.
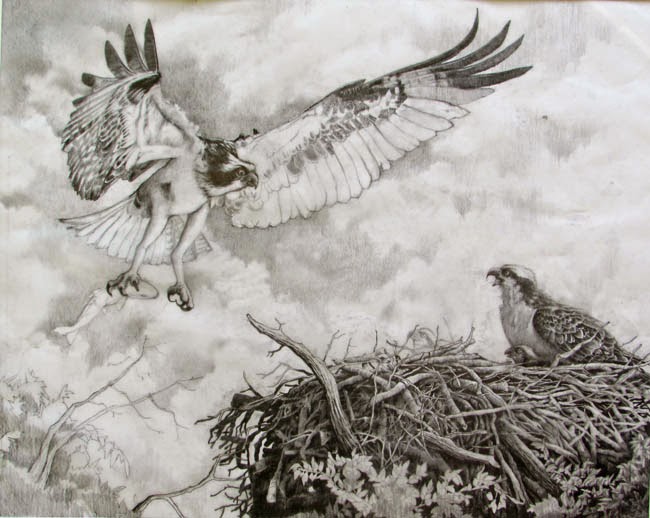
I tried out some value sketches and picked one that I thought would make a good painting. But, rather than launch right into the painting, I decided to work up a full size graphite drawing. In this way I could see how the background clouds would look full size. I could work out the pattern in detail to see if the vague image in my mind’s eye would look good in real.
            In addition, I wanted to work out the detailed structure of the nest so I didn’t have to try to work it out on the final paper. The values also were very important, so I wanted to be sure the values and their relationships were what I wanted.
            The final reason for working up a full size pencil drawing was to decide on the final size. I jumped back and forth on that a bit but after consulting with my wife and daughter, who were following the progress closely, I decided to enlarge it a bit from the 20” by 16” to 22” X 17”. Both my wife and daughter felt it would be better to include all of the tail of the mama bird in the nest, rather than cut it off. I had to agree. Any opinions out there?
            So, here is the final pencil drawing.
            I’ll have to work out the colors scheme for the background, the birds and the nest. That will be presented in the next update. From that final preparation step I’ll begin to work up the painting. At this point I’m still confident that I’ll do a watercolor background with colored pencil for the birds, nest and foliage. I’m considering working this pencil drawing into a finished form that could be made into prints. 


Wednesday, September 17, 2014

Portrait of Raine and Megan accepted into Colored Pencil Treasures

I was very pleased to hear that one of my colored pencil paintings has been accepted for publication in Colored Pencil Treasures, Volume III. Ann Kullberg, one of the finest colored pencil portrait artists in the world, and publisher of Colored Pencil Magazine, sponsored the competition. If you'd like to visit her website, it's annkullberg.com. Ann hopes to have Volume III out for the holidays. The painting that was accepted was my portrait of my grandchildren, Raine and Megan.

Work In Progress: Osprey: Lover’s Key, Florida Update 4


            Now that I’ve completed the thumbnail composition and value sketches, and gotten feedback from the client, I’m ready to work up the full size pencil drawing. There are still some compositional questions for me when it comes to the final painting, though. I’m still not sure how to present the bird in the nest. Do I want some chicks, also? I want the background to be benign but I’m also thinking of some low, diffuse clouds, rather than a solid uniform color. I want to see what the background might look like with some light clouds before trying it with paint. I suggested a misty, cloudy background in one of the value thumbnails and that composition interested me.  I also want to be sure the values I worked out look good in the full size drawing. It looks more and to me that I’m going to have to produce a full size pencil drawing with a lot of detail. That will reduce surprises and uncertainties to a minimum. It’s a lot more work but I feel more comfortable with it and well worth the extra time.
            I started working up a full size composition, 28” X 19”, in pencil on tracing paper. First, I blocked in the nest area in the bottom right, along with some foliage that might be present in the upper parts of the trees. Rather than draw the bird in flight directly on that same sheet, I blocked it in on a separate sheet of tracing paper. Once I was sure of the size and shape I placed it under the tracing and moved it around until I liked the position relative to the nest. Then I retraced it onto the sheet with the nest. After that I added more detail without any shading.
            As I was drawing the bird in flight I kept comparing its size to the nest to get the relative sizes right. I found that I had to increase the size of the nest some, so I kept adding on to it.
            After getting the bird in flight to a stage I was happy with, I decided to work on the nest. There’s a great deal of detail in that nest – a great many twigs and branches inter-twinned and woven into a massive and solidly built structure. Rather than work all that out on the final good paper (and have to erase and re-work) I worked it all out in the pencil drawing. I added shading as I filled it all in to see how the lighting would play on the twigs. The light is coming from the right side and is fairly low in the sky. That will make the right side of the birds and nest (and twigs, etc) lighter. The cloudy background will eliminate strong lighting but still allow lights and darks and shadows. I wanted to see if my mind’s eye view of the scene would be equaled by my pencil work.
            Composition 1 shows a side view of the bird in the nest. In Composition 2 I tried a frontal view of the bird. I then went to a back view in Composition 3. You’ll notice the size of the nest also increases from Composition 1 to Composition 3 as I decided it had to be larger. In the end I preferred the side view of the nesting bird (Composition 1). I also decided to add two chicks to the nest. They’re barely visible above the nest but can be seen on closer observation. The final positions and poses can be seen in Composition 4. I felt that the back view presented too large a bird in the nest. It began to compete for interest. The frontal view just wasn’t all that interesting. I preferred the side view where the bird was lower and not so imposing. Its shape pointed toward the bird in the air – the center of interest. I pointed its head upward also toward the bird in flight – and it looks that way, guiding the viewer’s eyes in that direction. In Composition 4 we see the same side view but with chicks added. They also look upward toward the bird in flight. You can see in Composition 4 that the nest has been increased in width. It looks more like it can accommodate all the birds.
            Once I was sure of the placement and sizes I started to work up the pencil drawing on tracing paper. This is where I added all the detail and values. I just started adding the detail to Composition 4. As I worked this drawing up I felt the drawing was too large, that I was including much more than I need to on both sides. The original drawing was 28” X 19”. I cut out a couple of frames from white drawing paper to see how the picture would look in other sizes. I like the look of the 20” X 16” because it seems more intimate, as it focuses on the subjects. But I’m not 100% sold yet and will keep comparing the different proportions until I am. Weigh in on the sizes if you wish. What size do you prefer – and why?
            Pencil Composition 3 shows the drawing nearly finished. All the detail is complete for the nest, the mama bird in the nest and most of the bird in flight. The background sky is nearly complete also. I’m happy with the values and the lights and darks of the clouds in the background seem to help tie the bird in flight and the nest birds together. The lower left is still incomplete and I am debating how much of that to include. There is a nice diagonal composition here and I don’t want the lower left to destroy that. I may work up that corner on an overlay to see what I think.
            Next week I’ll show the completed pencil drawing. Then it’s time to start painting!


Wednesday, September 10, 2014

Work In Progress: Osprey: Lover’s Key, Florida Update 3


After sending the thumbnails in an email packet to the client, I didn’t have to wait very long for a response. She liked the close up views of the osprey, rather than the more distant views. She also liked the idea of having a mama osprey and some chicks in the nest. That eliminated the first thumbnail.
            Which view of the flying osprey did she like? The one similar to the photo or the more dramatic, open wing, version? Well, the client liked the more dramatic pose. The open wing version was nearer the nest, nearer to landing, and showed more detail, especially on the wings.
            So, I now had a good starting point for a composition. Now, the next step was to work up value sketches. They would further enhance the composition by emphasizing some aspects and de-emphasizing others. Part of the value composition would be deciding on the light source. In my first value sketch the light is coming from the right. The bird in flight would be in full light, exposing all the details in the wings and body. I also added some variety to the background – the lights and shadows of clouds against the sky. They would be subtle so as not to compete with the bird but adding some interest.
            The second and third value sketches have the light coming from the left. The second has the light coming in more from the back of the bird while the third has the light coming more from the side. In the second, the front of the bird would be more in shadow while in the third the sides of the bird would be illuminated. Also, in the second, the sky is more uniform.
            I liked the idea of the bird in flight being front lit, so I decided on having the light come from the right. I also liked some interest in the background but knew I had to keep it diffuse and subtle. So, in the end I decided on value sketch 1.
            My next step is the work up a fairly detailed pencil drawing with values to see if I’m happy with the arrangements and values I decided on. I also am not sold on the poses of the birds in the nest, so I’m going to try a few different ones to see which looks best.
            Next week I’ll show some options for the birds in the nest, the one I decide on and also the final pencil drawing full size. I’ll need to work out a few color sketches, also, before I start the painting.
At this point it looks like I’ll be working up a 20” X 16” painting. The background will probably be watercolor and the birds and nest in colored pencil.


Wednesday, September 3, 2014

Work In Progress: Osprey: Lover’s Key, Florida Update 2


The next preliminary steps in the process toward a completed painting involve the gathering of reference material and then organizing the ideas into a number of quick sketches or thumbnails that indicate a crude composition.


            Reference Material
Now that I’ve chosen a subject (Osprey) and decided what I want to say (Osprey is flying back to its nest), it’s time to start working on a composition. The photo gives me an idea of what will be in the painting but none are clear enough to get any details, so the next step is to gather reference material. I need photos of osprey in various poses – flying, sitting on the nest, pictures of young birds, pictures of nests, pictures of trees similar to the ones in the photo.
Composing the Picture
Between the reference material and the photo taken by the client ideas begin to flood my brain. I want something similar to the photo but with more impact. The osprey has to take center stage and that’s the way I need to compose the picture. So, over a period of days I sketch out rough thumbnails, different layouts that tell the story I want to tell. In doing so, I try to keep in the back of my head as many principles of composition as I can. Those principles that I find most important are:
1.Think in terms of shapes and values. Simplify the things in the painting by doing thumbnails.
2. Lay out the things quickly to get the placement within the borders feeling comfortable. You can feel when the painting seems balanced.

3. Fit the things into some kind of pattern that directs the viewer’s attention through the picture to the center of interest.

4. Keep the things interesting by varying the shapes and sizes.

5. Do something to make the center of interest stand out. Use values color, contrast and intensity. Place the center of interest at one of the intersections of lines that divide the painting both vertically and horizontally into thirds.

I worked up some thumbnails based on the photograph provided me by the client.
I wanted to create more interest and drama so I decided to bring the osprey closer in – make it the center of interest. I increased the size to make it dominate the painting and placed it one third of the way in and one third of the way down on the left side. I placed the nest on the right side and decided to add a mama and one or two chicks in the nest to give it some interest. They will be subordinate to the flying bird because of their size and pose. Then I placed some branches both in the nest and on the left bottom to direct the eye toward the bird in flight. The group creates a sort of triangle that leads the eye from one to the other – around and around.
            You’ll notice that I’ve drawn two different views of the bird in flight. One is similar to the one in the photo, while the other is a bit more dramatic, with the wings outspread. I worked out 5 thumbnails in all and you can see them all here.
            Since the drawing is much different from the original photo, I decided I wanted the client to look at the sketches and also the two choices of the bird in flight to see how they coincided with her mental picture. Maybe she’ll be more happy with my more close up view of the birds – but maybe she is thinking more in terms of the photo view. I want her to be happy with the composition before I proceed. The pose of the bird is also important. She’ll let me know which bird she likes best. From there I’ll start to work out more details.
            Next week I’ll discuss the client’s reaction to my thumbnails and what view she prefers.


Wednesday, August 27, 2014

Work In Progress, Osprey: Lover’s Key, Florida, Update 1


          I’m going to try something different with this next painting. A different approach. In all my previous paintings I presented, as a first step, a completed preliminary drawing of the painting I was about to do, and then proceeded to paint it, explaining along the way how I accomplished each step. For one of my paintings I did present a few value and color thumbnails along with my thoughts. In this painting I want to go into a bit more depth in beginning stages – the thinking and planning stages. Most of the time it’s haphazard for me as I stumble through it, eventually coming up with a composition I like and then paint it. This time I want to do a more careful approach, showing the planning that goes into developing a composition. I’m doing it to help me be a little more methodical and thoughtful in planning out the painting and then executing it. Getting myself to consciously think through a composition – something I should be doing with every painting. The planning is the most important part and practicing it continually will make better paintings. That’s the idea, anyhow, and I certainly have a lot of room for improvement. In the process, this might also prove helpful to others who want to improve their paintings. My hope also is that other artists following this Work In Progress will contribute their own thoughts and comments that might improve upon the planning process.
            This is a commission piece and, as such, I will treat it that way, making decisions with the client’s wishes in mind. If it is purely the artist’s piece, decisions may be a bit different but if there is a desire to sell it, there still is a client out there to please.

The Subject: The reason for the painting in the first place
You start with a subject – something you want to paint a picture of. In this case it’s an osprey flying to its nest. This is a commission piece and it started with a photo taken by the client. It represents an exciting moment for the client, who just happened to see and then photograph an osprey coming back to a nest of fledglings after an excursion out to sea. The osprey, a majestic and beautiful bird of prey, its wings outstretched, is silhouetted against the sky – as is its nest and precious contents, high in a tree. When the client sees the finished painting we want it to be close to her recollection of the event, to evoke that same feeling of when she originally captured it. At the same time, the composition must be good enough to develop those same emotions in first time viewers, some of whom may have seen something similar in the past. The elements of the composition must have a relationship with each other that ties the whole together.
The photo, shown here, is from the client’s cell phone, the only camera available at the time to record the special moment. It depicts a lucky instant, just one in a train of images the client saw as the bird flew closer and eventually landed on the nest. But it is the one that the client wants a permanent record of – and one I am honored to do for her.

Medium, Size, Format and Proportions
            While some artists work in only one medium, I have not yet decided to put all my efforts into one particular one. I love both colored pencil and watercolor. I prefer colored pencil for portraits and close up studies and love watercolor for landscapes. In this case the client had no preference, so I’m leaning toward watercolor because of the large expanse of sky. But I’m not ruling out a combination of the two, as I did with the Sandpipers. That’s not a critical decision and by the time I start I’ll know which one (or both) I want to use.
            Size is another client decision and in this case she wants a larger painting. A larger size will have a bigger impact. Final size is a joint decision, based on what the client wants in the painting or wants to leave out. Or, the client may have no preferences at all and leave it all to the artist. They may only be interested in the subject. In this painting, the client is interested in the relationship of the bird to the nest. As long as I give a good representation of the original encounter, the details and their arrangement are my responsibility. At this stage in the planning process, I’m thinking that the largest dimension will be about 28”.
            Format, whether vertical or horizontal are also joint decisions where a client is involved. The client may have a particular spot in mind to hang it. The painting may look better in one or the other formats.
            Proportion is another decision that will have to be made before the painting is started. It also is based on content, what’s included and what is not, how the cropping is done.
            Format and proportion will be decided after preliminary thumbnail drawings are made.
            These are some of the considerations that have to be undertaken at the outset – before getting into the meat of the project. In the next Update I’ll discuss the second step in this process – composition - and how it will begin to answer some questions, such as size, format and proportions, and get us a step closer to painting.
             The first photo is the original one taken by the client, showing the osprey on its way back to the nest. It is in a horizontal format. The second photo is a cropped version of the first, showing the same scene in a vertical format. It is a bit tighter, showing less of the surrounding landscape. As I work through composition possibilities I'll decide which is the format I want to use.

Wednesday, August 20, 2014

Work in Progress Update, Eatonton, Georgia, Residence, Update 4


In this Update the rendering of the Home is complete. The brickwork has been painted in, lawn has been added and the tree trunks completed. A bit more shading in the portico and curtains has also been added.
First, the brick chimneys and walk were painted in. Here, cadmium red, raw umber and burnt umber were mixed to give the reddish – brown color I felt it needed. I painted in three or four washes to get the depth and intensity, tweaking it with a bit more red or umber with each wash to bring it to the final color. The washes were done wet on dry.
In between, I re-drew the lion statues on the pedestals and then inked them in.
Using hooker’s green, raw sienna and ultramarine blue in various combinations I washed in the lawn on both sides, wet on dry, quickly and simply indicating grass.
Next, using thin washes of paynes grey, I underlined each row of siding on the house, giving some shading under each board. A bit of shading was added to each lion statue and more detail to the curtains in the windows. More washes were also added to the portico to increase depth.
Finally, the tree trunks were painted in with thin washes of raw umber and some more pen and ink line work was added to the tall tree on the right.
This completes the pen and ink and watercolor rendering of a Home Portrait of a residence in Eatonton, Georgia. It will be matted and framed, then added to a display of my paintings now hanging at Brannen Bank in Dunnellon, Florida.


The subject for my next painting is an Osprey. It’s a commission piece from a photo taken by the client on Lover’s Key, off the west coast of Florida. I’m going to do something different in my approach to this painting, so stay tuned.